
Setting Up Local LLM with Ollama and Open WebUI on AMD 780M GPU
Large language models no longer have to run exclusively in the cloud, where your conversations are “stolen” by the provider. With the combination of Ollama for model serving and Open WebUI a browser front-end, you can run your models in a GPT-like interface entirely on your laptop or workstation. This guide also shows how accelerate the LLMs using an AMD 780M GPU, though the same setup works for any ROCm-capable card with little to no adjustments.
Why run a local LLM? Well, I want the LLM to check my work-related emails and rewrite them in good English, but I can’t feed the data-sensitive content to any of the current LLM provider (at least for their free tiers).
Setting up the Ollama
The first thing to do is run the LLMs in a containerised environment (from both security and usability standpoints).
1 Launch Ollama in a container
podman run -d \
  --name ollama \
  --device /dev/kfd \
  --device /dev/dri \
  -v ollama:/root/.ollama \
  -p 11434:11434 \
  docker.io/ollama/ollama:rocm
Two key items to note here:
/dev/kfdand/dev/dri exposethe GPU.- Port 11434 will be used for Ollama’s REST API
To verify, whether ollama is running:
podman ps
CONTAINER ID  IMAGE                         COMMAND  CREATED         STATUS         PORTS                     NAMES
7770950bde09  docker.io/ollama/ollama:rocm  serve    21 minutes ago  Up 21 minutes  0.0.0.0:11434->11434/tcp  ollama
2 Talk to Ollama from your host
Now the Ollama CLI should be accessible via:
podman exec -it ollama ollama --help
Large language model runner

Usage:
  ollama [flags]
  ollama [command]

Available Commands:
  serve       Start ollama
  create      Create a model from a Modelfile
  show        Show information for a model
  run         Run a model
  stop        Stop a running model
  pull        Pull a model from a registry
  push        Push a model to a registry
  list        List models
  ps          List running models
  cp          Copy a model
  rm          Remove a model
  help        Help about any command

Flags:
  -h, --help      help for ollama
  -v, --version   Show version information

Use "ollama [command] --help" for more information about a command.
Now you can search through models Ollama offers at Ollama’s website and choose the model you like (and your GPU will be able to handle it…).
podman exec -it ollama ollama pull deepseek-r1:8b
Expect a few GB download.
Test it
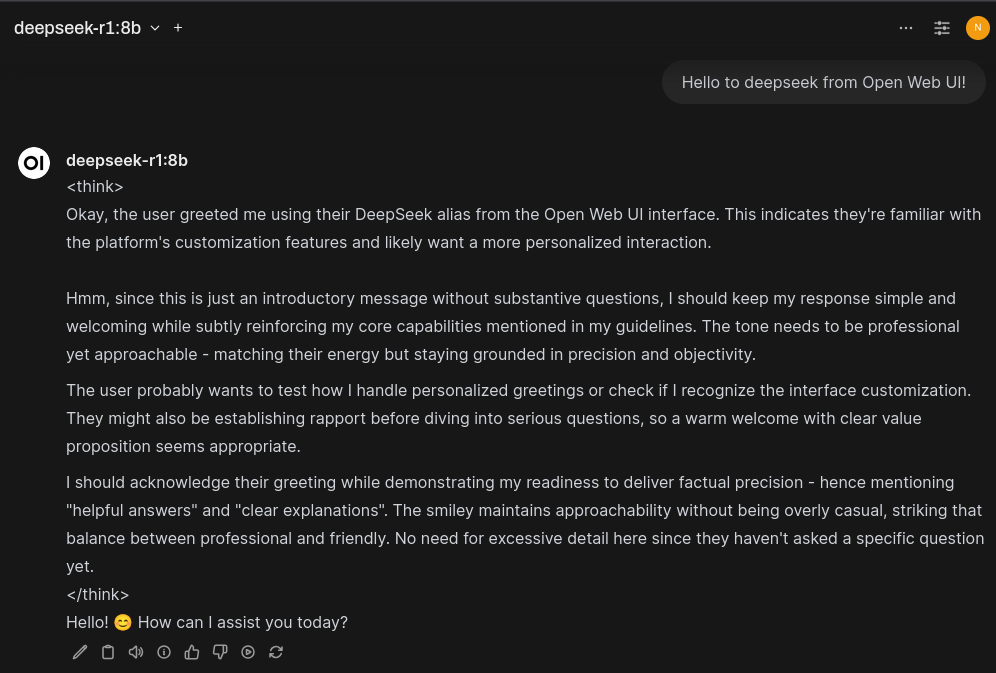
podman exec -it ollama ollama run deepseek-r1:8b
>>> Hello there!
Thinking...

Hello! 😊 Great to hear from you. What’s on your mind today?

>>> Send a message (/? for help)
Success - you’re chatting with a local LLM! But if we take a closer look, LLM is not GPU accelerated at all:
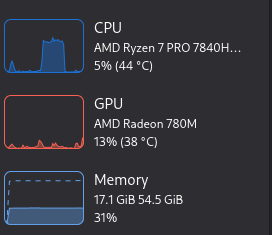
That’s because AMD doesn’t support 780M GPUs with their ROCm software. However, this can be easily circumvented. If the environment variable HSA_OVERRIDE_GFX_VERSION is added/overridden to 11.0.0 in the container, then ROCm thinks we have a 7900 XT(X), and since both cards have the same architecture RDNA 3, the acceleration works quite well.
podman exec -it ollama ollama run deepseek-r1:8b
>>> Hello there!
Thinking...

Hello! 😊 Great to hear from you. What’s on your mind today?

>>> Send a message (/? for help)
And now the LLM is GPU accelerated:

Last thing what remains to check is whether the Ollama is serving at the desired port:
curl http://127.0.0.1:11434/
Ollama is running⏎
Connecting LLM to Web UI
To provide a nice, ChatGPT-like web interface, you can use Open WebUI. It offers a fully containerized interface that can be launched with a simple command:
podman run -d --name open-webui --rm -p 23456:8080 ghcr.io/open-webui/open-webui:latest
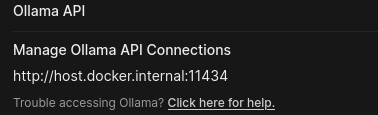
which will provide the web interface under localhost:23456. To connect the UI with your Ollama API, go to Settings -> Admin Settings -> Connections and set the Manage Ollama API Connections to your Ollama API. In this case, since Ollama is running inside container, it is http://host.docker.internal:11434
After that, you’re all set to start chatting with the LLM just like you’re used to! Don’t forget to check out the Open WebUI docs to explore all its features. A few highlights include the model builder, LLM pipelines, seamless model switching, and much more!
Running everything as a service
If you don’t want to start all the necessary services manually every time you want to use them, it’s a good idea to automate the process.
Use Compose or Kubernetes YAML
To orchestrate the services, you can define them using a compose.yaml or a Kubernetes manifest. This allows you to bring everything up with a single command, ensuring all services are started in the correct order and configuration, including the volume for storing the history with LLMs, so you don’t lose it every time.
Automate with a systemd User Service
A great way to avoid manually launching the orchestration is to integrate it as systemd user-level service. However, if your machine is used by more than one account, like in my case, it makes sense to take this one step further. Instead of tying the services to a single user session, you can set up a dedicated system user under which the services will run. The setup is the same, only thing needed is to set up the system user environment correctly, but that’s beyond of the scope of this post.
Summary
With everything written above, you are good to go with experimenting with local LLMs in nice looking UI with all the fancy automations steps, so the services starts up for you. Happy tinkering!
note:
If anyone would be interested in running the services as Kubernetes YAML with all the stuff, I am pasting the whole file here so you can borrow it:
apiVersion: v1
kind: PersistentVolumeClaim

metadata:
  name: ollama-data

spec:
  accessModes:
    - ReadWriteOnce
  storageClassName: dynamic-hostpath
  resources:
    requests:
      # this is the minimum size, it is dynamically expanded
      storage: 1Gi

---
apiVersion: v1
kind: PersistentVolumeClaim

metadata:
  name: open-webui-data

spec:
  accessModes:
    - ReadWriteOnce
  storageClassName: dynamic-hostpath
  resources:
    requests:
      # this is the minimum size, it is dynamically expanded
      storage: 1Gi

---
apiVersion: v1
kind: Pod

metadata:
  name: ollama-pod

spec:
  containers:
    - name: ollama
      image: docker.io/ollama/ollama:rocm
      securityContext:
        seLinuxOptions:
          type: container_runtime_t
      volumeMounts:
        - name: ollama-data
          mountPath: /root/.ollama
        - name: kfd
          mountPath: /dev/kfd
        - name: dri
          mountPath: /dev/dri
      env:
        - name: HSA_OVERRIDE_GFX_VERSION
          value: "11.0.0"
      ports:
        - containerPort: 11434
          hostPort: 11434

  volumes:
    - name: ollama-data
      emptyDir: {}
    - name: kfd
      hostPath:
        path: /dev/kfd
        type: CharDevice
    - name: dri
      hostPath:
        path: /dev/dri
        type: Directory

---
# I want them in separate pods since I don't want open-webui to touch ollama's volumes
apiVersion: v1
kind: Pod

metadata:
  name: open-webui-pod

spec:
  containers:
    - name: open-webui
      image: ghcr.io/open-webui/open-webui:latest
      volumeMounts:
        - name: open-webui-data
          mountPath: /app/backend/data
      ports:
        - containerPort: 8080
          hostPort: 23456

  volumes:
    - name: open-webui-data
      emptyDir: {}

---
apiVersion: v1
kind: Service

metadata:
  name: ollama-service

spec:
  selector:
    app: ollama
  ports:
    - protocol: TCP
      port: 11434
      targetPort: 11434
Comments